NetDVD troubleshooting
- Connection problems
- Firewall rules
- ImgBurn configuration
- No sound playing DVD movies with Media Player Classic
- Drive remains locked on NetDVD Server machine
- Cannot play DVD movies
- No internet connection after using NetDVD
- Changing the DVD region code of your DVD drive
- Ghost disk with question mark in explorer
- Problems with Windows Media Player in Windows 7
- Installing Windows 7 on your Netbook
Connection problems
Automatic connection
NetDVD Client should be able to automatically find and connect to a NetDVD Server running on the same network. For NetDVD Server the only
thing you need to do is start it. For NetDVD Client you select "Connect to server automatically" from the menu you get when right
clicking on the NetDVD icon in the system try.
If automatic connection doesn't work, try to make a manual connection.
Manual connection
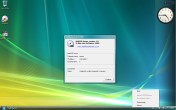
From NetDVD Client's options menu select "Connect to server manually", then enter the name or IP address of the computer that NetDVD Server
is running on. You can find both NetDVD Server's name and IP address when you select "About" from the NetDVD Server's options menu, as
is shown in the picture below.
Firewall rules
The most common problem if you can't make either an automatic or manual connection is if your firewall is not configured to allow NetDVD Client
to make a connection to NetDVD Server. Read the next section on how to solve this.
Firewall rules
On Windows XP, Windows Vista and Windows 7, Microsoft includes a firewall with the OS. The setup application for both NetDVD Client and NetDVD Server will configure Microsoft Window's built-in Firewall to allow connections between NetDVD Client and NetDVD Server. There is therefor nothing extra you need to do if you use the built-in Firewall on Windows XP, Windows Vista and Windows 7.
If you are using a different firewall application than Microsoft's built-in one, configure it on both the NetDVD Client and NetDVD Server machine to:
-
Open TCP port 789
Open UDP port 6033
ImgBurn configuration
If you use ImgBurn for burning CDs/DVDs then you need to configure it for use with NetDVD.
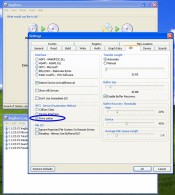
Select Tools->Settings from the menu and then select the I/O tab. Under "SPTI - Device Enumeration Method" click the "Drive letter" radio button. A screenshot is shown below.
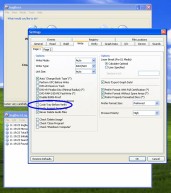
We also recommend that you disble "Cycle Tray Before Verify". Select Tools->Settings from the menu and then select the Write tab. Under "Options" unselect the "Cycle Tray Before Verify" checkbox. A screenshot is shown below.
No sound playing DVD movies with Media Player Classic
If you use Media Player Classic for playing DVD movies then sometimes you get no sound.
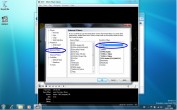
To fix this, select "Options" from the "View" menu. Then select "Internal Filters" in the left pane and tick the "AC3" box under "Transform Filters". Restart the application after that.
A screenshot from Windows 7 is shown below.
Drive remains locked on NetDVD Server machine
When NetDVD Server accepts a connection from a NetDVD Client, it will lock the CD/DVD drive. That means that you need to put the right CD or DVD disc in before you make the connection from the NetDVD Client machine. When you disconnect (from either NetDVD Client or the NetDVD Server), NetDVD Server will unlock the drive again.
In very rare situations it's possible that the drive remains locked, even after NetDVD Client and NetDVD Server are disonnected. Rebooting the NetDVD Server machine will unlock the drive.
Cannot play DVD movies
If your favorite DVD Movie Playback Application cannot play a particular DVD then:
-
Check the DVD drive's DVD region code.
Just like ordinary DVD players that you connect to your TV, the DVD drive in your PC is designed to honor DVD regions.
Typically you are allowed to change DVD regions 4 times. Some DVD Movie Playback Applications automatically check whether
your DVD disc has the same DVD region for which your DVD drive is currently configured. Others do not and they simply
don't play your DVD disc without any information as to why. You can try to change your DVD drive's region code.
Try playing the same DVD on your NetDVD Server machine with the same DVD Movie Playback Application.
If this doesn't work (and you don't have the above mentioned DVD region code problem) then this indicates a problem with the DVD
drive, the DVD Movie Playback Application or the DVD disc itself. If it does work then there might be a problem with NetDVD.
If the latter then contact us on support@bluelionsoftware.co.uk and we'll
do our best to help you out.
No internet connection after using NetDVD
In one of our test configurations where NetDVD Server is connected to the local network via WIFI, we've seen a problem where, after using NetDVD, the NetDVD Server machine doesn't accept any network data anymore. This is despite the fact that the connection to the wireless access point was still up and running. Rebooting the NetDVD Server machine temporarily solves the problem. After using NetDVD the problem would come back.
We've found that the problem went away after restarting the wireless access point (typically a wireless ADSL router). Failing that, you can try disabling WLAN security on your wireless access point, restarting it and enabling security again.
Changing the DVD region code of your DVD drive
Just like ordinary DVD players that you connect to your TV, the DVD drive in your PC is designed to honor DVD regions. Typically you are allowed to change the DVD region code 4 times. Some DVD Movie Playback Application automatically check whether your DVD disc has the same DVD region code for which your DVD drive is currently configured. Others do not and they simply don't play your DVD disc without any information as to why.
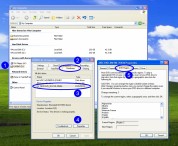
On all versions of Microsoft Windows you can change the region code of your DVD drive. Below is a description of how this is done together with a Windows XP screenshot. It works the same on Windows 2000, Windows Vista and Windows 7.
Ghost disk with question mark in explorer
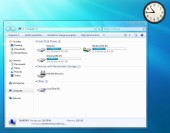
In rare situations the drive that NetDVD Client created was not removed from the system after disconnecting from NetDVD Server, leaving the system to think the drive still exists. Explorer shows the drive as a disk with a question mark, see the Windows 7 screenshot below.
Although it doesn't look nice, there is no real problem. Apart from the fact that you can't do anything with this ghost drive, Windows and all applications will function as normal. And you can still ask NetDVD Client to use the same drive letter as the ghost drive to create a new CD/DVD device. After restarting the ghost disk will be gone.
Problems with Windows Media Player in Windows 7
If you use Windows Media Player in Windows 7 then you won't be able to play DVDs or audio CDs when you connect to NetDVD Server running on a Windows 2000 or XP computer. Playing DVDs or audio CDs when connecting to a Windows Vista or another Windows 7 computer works fine. This is a compatibility problem between Windows Media Player in Windows 7 and other Windows software components on Windows 2000 and XP.
If you suffer from this problem, we recommend you use Media Player Classic, a free movie player which will work under Windows 7 and can play both DVDs and audio CDs.
We're currently investigating this compatibility problem and are working on a fix for it.
Installing Windows 7 on your Netbook
You can use NetDVD to install Windows 7 on your Netbook. This assumes you have downloaded the Windows 7 Beta or Release Candidate from Microsoft's website as an ISO file or have it on a DVD disc.
There are only 3 simple steps:
- Prepare your hardisk Typically you want Windows 7 to be installed on a different drive than where Windows XP is installed. If your Netbook only has a drive C: then you can shrink it and create an extra drive for Windows 7 using this free partition manager. I'd suggest to create a drive of at least 10GB for Windows 7.
- Run NetDVD Run NetDVD Client on your Netbook and NetDVD Server on the machine with the Windows 7 DVD disc or ISO file. If you've downloaded the ISO file directly to your netbook then run NetDVD Server on your Netbook too. Afterwards make a connection from NetDVD Client to NetDVD Server.
- Install Windows 7 You can now run the Windows 7 installer in Windows XP from the virtual DVD drive on your Netbook.
Windows 7 will start by copying all relevant files from the DVD to your Netbook's target partition. It won't need to access the DVD after rebooting your Netbook.
